Showing posts with label Java. Show all posts

Sunday, June 07, 2015

Towards a scalable Solr-based RDF Store

SolRDF (i.e. Solr + RDF) is a set of Solr extensions for managing (index and search) RDF data.


In a preceding post I described how to quickly set-up a standalone SolRDF instance in two minutes; here, after some work more or less described in this issue, I'll describe in few steps how to run SolRDF in a simple cluster (using SolrCloud). The required steps are very similar to what you (hopefully) already did for the standalone instance. 

All what you need  

  • A shell  (in case you are on the dark side of the moon, all steps can be easily done in Eclipse or whatever IDE) 
  • Java 7
  • Apache Maven (3.x)
  • Apache Zookeeper  (I'm using the 3.4.6 version)
  • git (optional, you can also download the repository from GitHub as a zipped file)


Start Zookeeper 


Open a shell and type the following

# cd $ZOOKEPER_HOME/bin
# ./zkServer -start

That will start Zookeeper in background (start-foreground for foreground mode). By default it will listen on localhost:2181

Checkout SolRDF


If it is the first time you hear about SolRDF you need to clone the repository. Open another shell and type the following:

# cd /tmp
# git clone https://github.com/agazzarini/SolRDF.git solrdf-download

Alternatively, if you've already cloned the repository you have to pull the latest version, or finally, if you don't have git, you can download the whole repository from here.

Build and Run SolRDF nodes


For this example we will set-up a simple cluster consisting of a collection with two shards.

# cd solrdf-download/solrdf
# mvn -DskipTests \
    -Dlisten.port=$PORT \
    -Dindex.data.dir=$DATA_DIR \
    -DskipTests \
    -Dulog.dir=ULOG_DIR \
    -Dzk=ZOOKEEPER_HOST_PORT \
    -Pcloud \
    clean package cargo:run

Where
  • $PORT is the hosting servlet engine listen port;
  • $DATA_DIR is the directory where Solr will store its datafiles (i.e. the index)
  • $ULOG_DIR is the directory where Solr will store its transaction logs.
  • $ZOOKEEPER_HOST_PORT is the Zookeeper listen address (e.g. localhost:2181)
The very first time you run this command a lot of things will be downloaded, Solr included. At the end you should see something like this:

[INFO] Jetty 7.6.15.v20140411 Embedded started on port [8080]
[INFO] Press Ctrl-C to stop the container...

the first node of SolRDF is up and running! 

(The command above assume the node is running on localohost:8080)

The second node can be started by opening another shell and re-executing the command above

# cd solrdf-download/solrdf
# mvn -DskipTests \
    -Dlisten.port=$PORT \
    -Dindex.data.dir=$DATA_DIR \
    -DskipTests \
    -Dulog.dir=ULOG_DIR \
    -Pcloud \
    cargo:run

Note:
  • "clean package" options have been omitted: you've already did that in the previous step
  • you need to declare different parameters values (port, data dir, ulog dir) if you are on the same machine
  • you can use the same parameters values if you are on a different machine
If you open the administration console you should see something like this:


(Distributed) Indexing


Open another shell and type the following (assuming a node is running on localhost:8080):

# curl -v http://localhost:8080/solr/store/update/bulk \
    -H "Content-Type: application/n-triples" \
    --data-binary @/tmp/solrdf-download/solrdf/src/test/resources/sample_data/bsbm-generated-dataset.nt 


Wait a moment...ok! You just added 5007 triples! They've been distributed across the cluster: you can see that by opening the administration consoles of the participating nodes. Selecting the "store" core of each node, you can see how many triples have been assigned to that specific node.


Querying


Open another shell and type the following:

# curl "http://127.0.0.1:8080/solr/store/sparql" \
  --data-urlencode "q=SELECT * WHERE { ?s ?p ?o } LIMIT 10" \
  -H "Accept: application/sparql-results+json"
...  

# curl "http://127.0.0.1:8080/solr/store/sparql" \
  --data-urlencode "q=SELECT * WHERE { ?s ?p ?o } LIMIT 10" \
  -H "Accept: application/sparql-results+xml"
...

  In the examples above I'm using only (for indexing and querying) the node running on localhost:8080 but you can send the query to any node in the cluster. For instance you can re-execute the query above with the other node (assuming it is running on localhost:8081):

# curl "http://127.0.0.1:8081/solr/store/sparql" \
  --data-urlencode "q=SELECT * WHERE { ?s ?p ?o } LIMIT 10" \
  -H "Accept: application/sparql-results+json"
...  


You will get the same results.

Is that ready for a production scenario? No, absolutely not. I think a lot needs to be done on indexing and querying optimization side. At the moment only the functional side has been covered: the integration test suite includes about 150 SPARQL queries (ASK, CONSTRUCT, SELECT and DESCRIBE) and updates (e.g. INSERT, DELETE) taken from the LearningSPARQL book [1], that are working regardless the target service is running as a standalone or clustered instance.

I will run the first benchmarks as soon as possible but honestly at the moment I don't believe I'll see high throughputs.

Best,
Andrea

[1] http://www.learningsparql.com

Sunday, December 21, 2014

A Solr RDF Store and SPARQL endpoint in just 2 minutes

How to store and query RDF data in Solr? Here is a quick guide, just 2 minute / 5 steps and you will get that ;)

1. All what you need  

  • A shell  (in case you are on the dark side of the moon, all steps can be easily done in Eclipse or whatever IDE) 
  • Java (7)
  • Apache Maven (3.x)
  • git 

2. Checkout SolRDF code

Open a shell and type the following:

# cd /tmp
# git clone https://github.com/agazzarini/SolRDF.git solrdf-download

3. Build and Run SolRDF


# cd solrdf-download/solrdf
# mvn clean install
# cd solrdf-integration-tests
# mvn clean package cargo:run

The very first time you run this command a lor of things will be downloaded, Solr included. At the end you should see something like this:

[INFO] Jetty 7.6.15.v20140411 Embedded started on port [8080]
[INFO] Press Ctrl-C to stop the container...

SolRDF is up and running! 

4. Add some data

Open another shell and type the following:

# curl -v http://localhost:8080/solr/store/update/bulk?commit=true \
  -H "Content-Type: application/n-triples" \
  --data-binary @/tmp/solrdf-download/solrdf/src/test/resources/sample_data/bsbm-generated-dataset.nt 


Wait a moment...ok! You just added (about) 5000 triples!

5. Execute some query

Open another shell and type the following:

# curl "http://127.0.0.1:8080/solr/store/sparql" \
  --data-urlencode "q=SELECT * WHERE { ?s ?p ?o } LIMIT 10" \
  -H "Accept: application/sparql-results+json"
...  

# curl "http://127.0.0.1:8080/solr/store/sparql" \
  --data-urlencode "q=SELECT * WHERE { ?s ?p ?o } LIMIT 10" \
  -H "Accept: application/sparql-results+xml"
...


Et voilĂ ! Enjoy! I'm still working on that...any suggestion about this idea is warmly welcome...and if you meet some annoying bug feel free to give me a shout ;)

Monday, December 01, 2014

Loading RDF (i.e. custom) data in Solr


Update: SolRDF, a working example of the topic discussed in this post is here. Just 2 minutes and you will be able to index and query RDF data in Solr.

The Solr built-in UpdateRequestHandler supports several formats of input data. It delegates the actual data loading to a specific ContentStreamLoader, depending on the content type of the incoming request (i.e. the Content-type header of the HTTP request). Currently, these are the available content types declared in the UpdateRequestHandler class:
  • application/xml or text/xml
  • application/json or text/json
  • application/csv or text/csv
  • application/javabin
So, a client has several options to send its data to Solr; all what it needs is to prepare those data in a specific format and call the UpdateRequestHandler (usually located at /update endpoint) specifying the corresponding content type

> curl http://localhost:8080/solr/update -H "Content-Type: text/json" --data-binary @/home/agazzarini/data.json

The UpdateRequestHandler can be extended, customized, and replaced; so we can write our own UpdateRequestHandler that accepts a custom format, adding a new content type or overriding the default set of supported content types.

In this brief post, I will describe how to use Jena to load RDF data in Solr, in any format supported by Jena IO API.
This is a quick and easy task mainly because:
  • the UpdateRequestHandler already has the logic to index data
  • the UpdateRequestHandler can be easily extended
  • Jena already provides all the parsers we need
So doing that, is just a matter of subclassing UpdateRequestHandler in order to override the content type registry:

public class RdfDataUpdateRequestHandler extends UpdateRequestHandler
...
    protected Map createDefaultLoaders(NamedList parameters) {
           final Map<String, ContentStreamLoader> registry 

                      = new HashMap<String, ContentStreamLoader>();
           final ContentStreamLoader loader =
new RdfDataLoader();
           for (final Lang language : RDFLanguages.getRegisteredLanguages()) {
                  registry.put(language.getContentType().toHeaderString(), loader);
           }
           return registry;
    }


As you can see, the registry is a simple Map that associates a content type (e.g. "application/xml") with an instance of ContentStreamLoader. For our example, since the different content types will always map to RDF data, we create an instance of a dedicated ContentStreamLoader (RdfDataLoader) once; that instance will be associated with all built-in content types in Jena. That means each time an incoming request will have a content type like
  • text/turtle
  • application/turtle
  • application/x-turtle
  • application/rdf+xml
  • application/rdf+json
  • application/ld+json
  • text/plain (for n-triple)
  • application/n-triples
  • (others)
Our RdfDataLoader will be in charge to parse and load the data. Note that the above list is not exhaustive, there a lot of other content types registered in Jena (See the RDFLanguages class). 

So, what about the format of the data? Of course, it still depends on the content type of your RDF data, and most important, it has nothing to do with those data we used to send to Solr (i.e. SolrInputDocuments serialized in some format).

The RdfDataLoader is a subclass of ContentStreamLoader

public class RdfDataLoader extends ContentStreamLoader

and, not surprisingly, it overrides the load() method:

public void load()
            final SolrQueryRequest request,
            final SolrQueryResponse response,
            final ContentStream stream,
            final UpdateRequestProcessor processor) throws Exception {


        final PipedRDFIterator<Triple> iterator = new PipedRDFIterator<Triple>();
        final PipedRDFStream
<Triple> inputStream  = new PipedTriplesStream(iterator);    
        // We use an executor for running the parser in a separate thread
        final ExecutorService executor = Executors.newSingleThreadExecutor();

        final Runnable parser = new Runnable() {
              public void run() {
                   try {
                        RDFDataMgr.parse(
                            inputStream,
                            stream.getStream(),
                            RDFLanguages.contentTypeToLang(stream.getContentType()));
                   } catch (final IOException exception) {

                      ...
                   }
              }
        };


        executor.submit(parser);
        while (iterator.hasNext()) {
          final Triple triple = iterator.next();
            // create and populate the Solr input document
            final SolrInputDocument document = new SolrInputDocument();
            ...
             // create the update command
            final AddUpdateCommand command  = new AddUpdateCommand(request);
            // populate it with the input document we just created
            command.solrDoc = document;


            // add the document to index
            processor.processAdd(command);

        } 
}

That's all...now, once the request handler has been registered within Solr (i.e. in solrconfig.xml), with a file containing RDF data in n-triples format, we can send to Solr a command like this:

> curl http://localhost:8080/solr/store/update -H "Content-Type: application/n-triples" --data-binary @/home/agazzarini/triples_dogfood.nt


Monday, November 10, 2014

Preloading data at Solr startup

Yesterday, I was explaining to a friend of mine something about Solr. So I had several cores with different configurations and some sample data.

While switching between one example and another I just realized that each (first) time I had to load and index the sample data manually. That was good for the very first time, but after that, it was just a repetitive work. So I started looking for some helpful built-in thing...and I found it (at least I think): the SolrEventListeners

SolrEventListener is an interface that defines a set of callbacks on several Solr lifecycle events:
  • void postCommit()
  • void postSoftCommit()
  • void newSearcher(SolrIndexSearcher newSearcher, SolrIndexSearcher currentSearcher)
For this example, I'm not interested in the two first callbacks because the corresponding invocations will happen, as their name suggests, after hard and soft commit events.
The interesting method is instead newSearcher(...) which allows me to register a custom event listener associated with two events:
  • firstSearcher
  • newSearcher
In Solr, the Index Searcher which serves requests at a given time is called the current searcher.  At startup time, there's no current searcher because the first one is created; hence we are in the "firstSearcher" event, which is exactly what I was looking for ;)

When another (i.e new) searcher is opened, it is prepared (i.e. auto-warmed) while the current one still serves the incoming requests. When the new searcher is ready, it will become the current searcher, it will handle any new search requests, and the old searcher will be closed (as soon as all requests it was servicing finish). This scenario is where the "newSearcher" callback is invoked.

As you can see, the callback method for those two events is the same, there's no a "firstSearcher" and a "newSearcher" method. The difference resides in the input arguments: for "firstSearcher" events there's no a currentSearcher so the second argument is null; this is obviously not true for "newSearcher" callbacks where both first and second arguments contain a valid searcher reference.

Returning to my scenario, all what I need is
  • to declare that listener in solrconfig.xml
  • a concrete implementation of SolrEventListener
 In solrconfig.xml, within the <udateHandler> section I can declare my listener

<listener event="firstSearcher" class="a.b.c.SolrStartupListener">
    <str name="datafile">${solr.solr.home}/sample/data.xml&lt;/str>
</listener>

The listener will be initialized with just one parameter, the file that contains the sample data. Using the "event" attribute I can inform Solr about the kind of event I'm interested on (i.e firstSearcher).

The implementation class is quite simple: it extends SolrEventListener:

public class SolrStartupListener implements SolrEventListener

in the init(...) method it retrieves the input argument:

@Override
public void init(final NamedList args) {
    this.datafile = (String) args.get("datafile");
}

last, the newSearcher method preloads the data:

    LocalSolrQueryRequest request = null;
    try {
           // 1. Create the arguments map for the update request
           final NamedList args = new SimpleOrderedMap();
            args.add(

                    UpdateParams.ASSUME_CONTENT_TYPE,  
                    "text/xml");
            addEventParms(currentSearcher, args);

            // 2. Create a new Solr (update) request
            request = new LocalSolrQueryRequest(

                     newSearcher.getCore(), 
                     args);
           
            // 3. Fill the request with the (datafile) input stream
           
final List streams = new ArrayList();
            streams.add(new ContentStreamBase() {
                @Override
                public InputStream getStream() throws IOException {
                    return new FileInputStream(datafile);
                }
            });
           
            request.setContentStreams(streams);
           
            // 4. Creates a new Solr response
           
final SolrQueryResponse response = 
                new SolrQueryResponse();
           
            // 5. And finally call invoke the update handler
            SolrRequestInfo.setRequestInfo( 

                new SolrRequestInfo(request, response))

            newSearcher
                 .getCore()
                 .getRequestHandler("/update")
                 .handleRequest(request, response);    
  
        } finally {
            request.close();
        }


Et voilĂ , if you start Solr you will see sample data loaded. Other than avoiding me a lot of repetitive tasks, this could be useful when you're using a SolrCore as a NoSql storage, like for example if you are storing SKOS vocabularies for synonyns, translations and broader / narrower searches.    

Thursday, October 23, 2014

SPARQL Integration tests with jena-nosql

In a previous post I illustrated how to set up a working environment with jena-nosql using either Apache Solr or Apache Cassandra. Now it's time to write some integration tests. 

The goal of the jena-nosql project is to have Apache Jena, one of the most popular RDF frameworks, bound with your favourite NoSQL database.

Among a lot of things that Jena can do, SPARQL definitely plays an important role so, in my project, I want to make sure the data model of the underlying pluggable storages is able to efficiently support all the query language features.

As a first step I need an integration test for running SPARQL verifiable examples. In order to do that I will set up two Jena Models, in the @Before method: a first coming from jena-nosql:

final StorageLayerFactory factory = StorageLayerFactory.getFactory();
final Dataset dataset = DatasetFactory.create(factory.getDatasetGraph());   
final Model jenaNoSqlModel = dataset.getDefaultModel();   

and a second using the default in-memory Jena Model:

final Model inMemoryModel = DatasetFactory.createMem().getDefaultModel();   

Now what I need is a set of verifiable scenarios, each of one consisting of
  • one or more dataset to load 
  • a query
  • the corresponding query results
I would need this "triplet" for each scenario...and as you can imagine, that's a huge work!

Fortunately, some time ago I bought a cool book, "Learning SPARQL" which had a lot of downloadable examples. After re-having a quick look, I realized that was exactly what I need :)

Each example in the book is associated with three files:
  • a file containing a short dataset
  • a file containing a query
  • a file containing results in a human readable way
Perfect! I don't need the third file because the verification can be done by comparating the execution of the load / query sequence both in jena-nosql and in-memory model (assuming the Jena in memory model is perfectly working)

So before running each scenario both models are loaded with the example dataset:

jenaNoSqlModel.read(dataset, ...);  
inMemoryModel.read(dataset, ...);   

// Make sure data has been loaded and graphs are isomorphic
assertFalse(jenaNoSqlModel.isEmpty());
assertTrue(jenaNoSqlModel.isIsomorphicWith(inMemoryModel));

Once did that, it's time to execute the query associated with the example and then verify the results on both models:

final Query query = QueryFactory.create(readQueryFromFile(queryFile));
assertTrue(    ResultSetCompare.isomorphic(
          QueryExecutionFactory.create(query, jenaNoSqlModel).execSelect(),
          QueryExecutionFactory.create(query, inMemoryModel).execSelect());

For simplicity here I'm wrongly using jena resources like QueryExecution (you should close that in a finally block) and I didn't write any exception handling code.

I'm still working on that, but if you want to have a quick look here's the code. As explained in previous posts you can run this test against one of the available storages (Solr or Cassandra):

   > mvn clean install -P cassandra-2x 
   > mvn clean install -P solr-4x 

Saturday, September 06, 2014

Integration tests with jena-nosql and Solr

The main goal of the jena-nosql project is to have a framework for building a set of noSQL storage bindings for Apache Jena.

So the idea is that using a piece of code like this

final StorageLayerFactory factory = StorageLayerFactory.getFactory();
final Dataset dataset = DatasetFactory.create(factory.getDatasetGraph());   
final Model model = dataset.getDefaultModel().read(...);    
final Query query = QueryFactory.create(...);
final ResultSet resultset = QueryExecutionFactory.create(query, dataset)).execSelect(); 
factory.getClientShutdownHook().close();

I'd be able to insert and query some data using Jena API.
But where? That actually depends on the binding we choose. At the moment, in order to "test" the framework idea I created two modules: one for Cassandra and the other for Solr.

As you can see in the project there's a module for doing integration tests. There, I had to think, before running those tests, some way to start one storage or another in a transparent way.      

As you probably know, if you read some other post of mine, I am a big fan of Apache Maven, and I must say that in these situations it is a very great and productive tool.

In the previous post I (briefly) explained how to start the integration test suite with a backing Apache Cassandra. Here I'll do the same but using Apache Solr.

There isn't an official Maven plug-in for Solr, this is the main difference with Cassandra. So after googling a bit I decided to use Cargo.

Cargo has a nice and powerful Maven plug-in that I configured within a solr-4x profile in my pom.xml. Doing so I'm able to run

   > mvn clean install -P solr-4x 
 
The very first time you run this command, Maven, as usual, will download all required dependencies including the solr war. Once did that, it will
  • start an embedded Jetty instance with Solr deployed inside;
  • run the integration test suite;
  • stop Jetty 
So, at the end, running the same test suite against one storage or another, it is just a matter of using a different Maven profile in the build ;)

Thursday, August 21, 2014

Integration tests with jena-nosql and Cassandra

In this post I will illustrate the integration tests infrastructure I used for the jena-nosql project on my GitHub account.

This article has been "copied" from the project Wiki, you can find the original content here.

The core of the project itself is not associated with a specific storage, so a set of integration tests that run towards a (mini)instance of a not-well-known target storage is required in order to make sure about the functional correctness of each binding.

Within the project you can see a (Maven) module dedicated to integration tests: the jena-nosql-integration-tests. It is configured with the Maven Failsafe plugin [1] to run tests, during the integration-test phase, against a running instance of the target storage.

And here comes the beauty, because the target storage is not predefined, but instead depends on what is the runtime binding module that has been choosen. So basically the same set of integration tests could be run against Cassandra, HBase, Accumulo or another storage.

How can we maintain the same set of tests and at the same time start a test instance of one storage or another? Maven profiles is the answer (at least for me): within the pom.xml of the jena-nosql-integration-tests, I defined one profile for each storage (at the time of writing there's just one profile ;) ).

So for example the cassandra-2x profile declares the usage of the Cassandra Maven Plugin [2] that
  • starts an embedded instance of Cassandra before all integration tests
  • stops that instance after the last integration test
So, at the end, if you want to run the integration test suite against Cassandra, just cd to jena-nosql project directory (where the top level pom.xml is located) and run Maven as follows:

   > mvn clean install -P cassandra-2x 
 
You don't need to set any permission or any configuration because the embedded instance will "live" within the target build folder.

[1] http://maven.apache.org/surefire/maven-failsafe-plugin
[2] http://mojo.codehaus.org/cassandra-maven-plugin

Monday, August 18, 2014

Jena-nosql: A NoSQL adapter for Apache Jena

Few days ago I started this project on github.


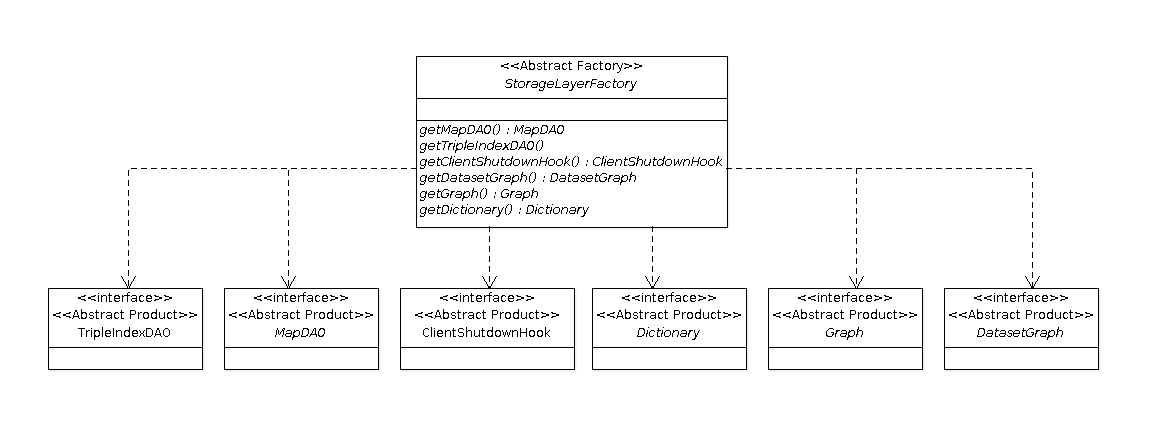
The overall design rounds around the Abstract Factory design pattern [1].
As you can see from the following diagram, the StorageLayerFactory class plays the role of the AbstractFactory and therefore defines the contract that each concrete implementor (i.e. family) must provide in order to create concrete products for a specific kind of storage.  


On top of that, each binding module defines the "concrete" layer that is in charge to provide
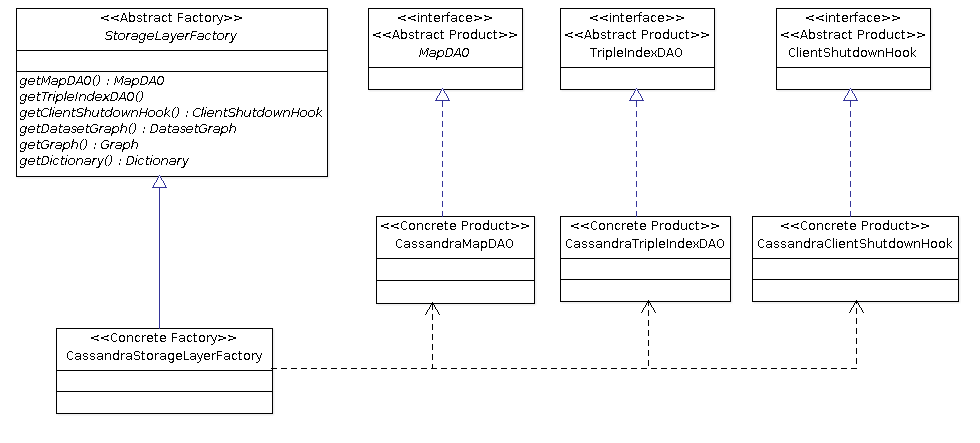
  • an implementation of the StorageLayerFactory (i.e. the Concrete Factory);
  • a concrete implementation of each (abstract) product defined in the diagram below (i.e. the Concrete Products)
Here you can see the same diagram as above but with the "Cassandra" family members (note that only 4 members are shown in order to simplify the diagram)

 
Feel free to take a look and let me know your thoughts.
Gazza

Friday, May 15, 2009

Dependency Injection with EJB 2.x

Very often, I see in an EJB 2.x environment message driven or session beans with the following code :

public void onMessage(Message message)
{
Connection connection = null;
try
{
Context ctx = new Context();
DataSource datasource = (DataSource)ctx.lookup("jdbc/ds");
Connection connetion = ....
// Do somethign with connection
} catch(NamingException exception)
{
// Do something
} catch(SQLException exception)
{
// Do something
} finally
{
try { connection.close(); } catch(Exception ignore) {}
}
}

...or (better) using a service locator :

public void onMessage(Message message)
{
Connection connection = null;
try
{
ServiceLocator serviceLocator = new ServiceLocator();
DataSource datasource = serviceLocator.getDataSource("jdbc/ds");
Connection connetion = ....
// Do somethign with connection
} catch(NamingException exception)
{
// Do something
} catch(SQLException exception)
{
// Do something
} finally
{
try { connection.close(); } catch(Exception ignore) {}
}
}

What is the problem? That piece of code (doesn't matter if it belongs to a session or a message driven bean) should IMO contains only business logic;
I mean, the logic that should make sense, from a business point of view, of that EJB.
Now, again, what is the problem? JDBC Code? Why don't we use a Data Gateway (or in general a data access pattern)?
Yes, that's right, but that's not the point.
Let's make a strong precondition supposing that jdbc code is part of business logic.
What else?

Look at this line of code :

} catch(NamingException exception)
{
// Do something
}

This exception is thrown when some problem occurs with naming service. The funny thing is that we are looking up the resource (a datasource in this case) each time this method is called. What is the problem?

There are at least three issues :

1) Each call to Context.lookup(...) is theoretically a remote call. Here that call is done each time a message arrives. You may think that code could be optimized, looking up the resource the first time, but you must in any case catch the Naming Exception (even if the lookup isn't really executed)
2) What you need is the resource that is bound with the naming service under the name "jdbc/ds", not the naming service itself. Once you got it, you have all what you need in order to retrieve valid database connections. So you should use that lookup code once and only once.
3) NamingException is not a business excepiton...the corresponding "throwing" code it's not part of the business logic too, but the onMessage(), where only the business logic should be, must contain the try-catch statement in order to handle a scenario where a naming service occurs...EACH TIME THE CODE IS EXECUTED!.

The usage of a service locator doesn't solve the problem completely : even if we cache the resource (on service locator), we will avoid the 1) & 2) but not the 3th issue.
In fact the signature of the getDatasource(...) method is throwing a NamingException and therefore the calling code must catch it everytime.

The ideal solution should:

1) make a lookup call only once;
2) catch the naming exception only once (when the lookup call is executed)
3) in case of naming exception (naming service failure) the call should be repeated until the resource is available.

public void GxMessageDriven implements MessageDrivenBean, MessageListener
{
private DataSource datasource;

public void onMessage()
{
// Here we can use directly the datasource instance that
// has been self-injected in ejbCreate() method at startup.
Connection connection = null;
try
{
connection = datasource.getConnection()
} catch(SQLException exception)
{
...
} finally
{
try { connection.close } catch(Exception ignore){}
}
}

public void ejbCreate()
{
try
{
// Using a service locator should be better
Context ctx = new InitialContext();
datasource = (DataSource) ctx.lookup("jdbc/ds");
} catch(NamingException exception)
{
// This ejb cannot be initialized because a needed resource cannot be retrieved
}
}
}

As you can see the lookup code (and the corresponding catch of the NamingException) is executed only once in the ejbCreate().
The first obvious consequence is that within onMessage() method the datasource member instance is used directly because it is already intialized.
There's only remaining open issue : what happens if the lookup fails in the ejbCreate? Basically that means the onMessage method will throw a NullPointerException and obviously we don't want that :)
If you are thinking about an if statement within the onMessage method :

if (datasource != null)
{
....
}

That means probably you didn't read my previous post : I hate if statements :) I think is better to equipe the ejb component with a state pattern in the following way :

1) create a member instance which will represent the current state of the component:

private MessageListener currentState;

2) create one inner class which represents the WORKING state:

private final MessageListener WORKING = new MessageListener()
{
public void onMessage()
{
// Here we can use directly the datasource instance that
// has been self-injected in ejbCreate() method at startup.

Connection connection = null;
try
{
connection = datasource.getConnection()
} catch(SQLException exception)
{
...
} finally
{
try { connection.close } catch(Exception ignore){}
}
}
}

3) Create another inner class which represents the OFF state :

private final MessageListener OFF = new MessageListener()
{
public void onMessage(Message message)
{
try
{
Context ctx = new InitialContext();
datasource = (DataSource) ctx.lookup("jdbc/ds");

// State change : OFF --> WORKING
currentState = WORKING;

// Process the message
currentState.onMessage(message);
} catch(NamingException exception)
{
// Don't change current state...resource is not yet available
}
}
}

4) Update the memeber instance variable in order to set the OFF state as default state.

private MessageListener currentState = OFF;

At this point, you should probably see that the ejbCreate is no longer useful because the check is made by the OFF state the first time the component raises up.

So, the final code should look like this :

public void GxMessageDriven implements MessageDrivenBean, MessageListener
{
private final MessageListener OFF = new MessageListener()
{
public void onMessage(Message message)
{
try
{
Context ctx = new InitialContext();
datasource = (DataSource) ctx.lookup("jdbc/ds");

// State change : OFF --> WORKING
currentState = WORKING;

// Process the message using the working state
currentState.onMessage(message);
} catch(NamingException exception)
{
// Don't change current state...resource is not yet available
}
}
}

private final MessageListener WORKING = new MessageListener()
{
public void onMessage()
{
// Here we can use directly the datasource instance that
// has been self-injected in ejbCreate() method at startup.

Connection connection = null;
try
{
connection = datasource.getConnection()
} catch(SQLException exception)
{
//...
} finally
{
try { connection.close } catch(Exception ignore){}
}
}
}
private DataSource datasource;
private MessageListener currentState= OFF;
}